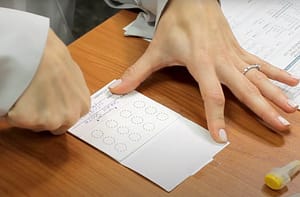
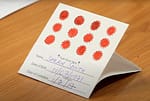
The Finger Pricker Blood Spot collection method is used for a variety of tests including but not limited to the Vitamin D test. It’s an accredited sample collection method used by most laboratories.
That’s not to say it’s as easy as saliva hormone testing. And if the SST Blood Spot collection is performed incorrectly, the experience can be painful and for some even frightening.
For this reason we have outlined below the steps involved when using this specimen sample collection method. We strongly advise reading the steps in advance of the specimen collection. And we also recommend getting in touch with us if you’re unsure about anything.
Part A – Introduction
It’s important that this sample collection only be performed when the time is right.
And not…
- When you are in a hurry,
- You feel sick, unwell or unusually stressed (unless otherwise instructed by your physician).
The steps outlined below are designed to induce blood flow to the fingertip, which will make this test easier to perform. Remember, you can always STOP THE COLLECTION, and we recommend you do so if you have difficulty. Don’t be worried though, it’s not a hard process provided the steps are followed correctly.
Please note: The information below is not intended as a replacement or substitute to the manufacturers own instructions, which can be found inside the test kits themselves. This process is demonstrated in the testing laboratories own Blood Spot Collection Video Tutorial.
Terminology you may encounter:
- Serum Separator Tube (SST) – Maintains separation of specimens during transportation.
- Blood Spot Card – This is where you will place small amounts of your blood for testing.
- Blood Spot Test – A test requiring a number of serum micro-samples, using the Blood Spot Card.
- Finger Pricker Vial – A device used to both prick the finger, and also store the blood collected (vial).
- Finger Pricker Device – Also known as ‘Lancet’. A trigger fires a sterile pin designed to puncture the skin.
OK, now let’s look at how to best prepare for a Finger Prick Blood Spot specimen collection.
IMPORTANT: In the event that you are having difficulty drawing the required amount of blood, Stop! The test can be done another time. Feeling the slightest amount of stress will make it much harder.
Part B – Preparation
Preparing for this sample collection is important and will improve our chances of a successful outcome. It’s best to start by adding your personal information to the Blood Spot Card. Without it, no testing can take place.

Take your time and get it right.
General steps:
- Fasting – Is recommended for 8 hours prior to collection.
- Hydration – Drink water in the hour beforehand.
- Temperature – Be covered or warmly clothed when performing the sample collection.
Stay in this position until you are ready to proceed to the next step. You are now ready to open the Finger Pricker device.
Part C – Specimen Collection
Position: Being seated is essential, and lowering the hand you intend to use to collect the sample toward the ground will allow for blood to flow into the fingers. You may feel a tingling type sensation in the fingers after a few minutes.
Taking the sample should be attempted with the elbow in the raised position with the hand slightly lower. Your hand should now be roughly chest / chin high, with the fingers pointed toward the ground.
Things to remember:
- Do not raise either the elbow or the hand above shoulder level.

Looking complete.
- Holding the hand (pointed) up, will slow blood flow immediately.
Using the Finger Pricker device, point the lancet firmly against the palm side tip of the selected finger. With the lancet positioned, push the button until a ‘click’ sound is heard. Place the lancet on the table and squeeze the finger below the tip to express more blood. Do not allow the hand to drop toward the ground during this time. You are now ready to apply blood evenly to the blood spot card.
Tip! – If you have not done so already, place your details on the Blood Spot Card too.
Feeling Stressed? – Delay the Test
To perform this test whilst stressed is virtually impossible. Because when we get stressed our bodies release adrenaline, and one of the effects adrenaline has is to “pull” blood back to the heart in preparation for the fight or flight response. So the fingertips, nose, and toes are the first places we lose blood flow.
Call 000 (triple zero) in an emergency.
More:
Full List of Saliva Hormone Test Kits
-

Adrenal Function Extended Profile Test Kit
Salivary adrenal-cortex assessment. DHEA's x 1 + Cortisol x 4. View Sample Report.$207.90Read More -

Fertility Balance G2 Hormone Test (Basic)
DHEAs, Estrogen [E2], Testosterone, Progesterone. Includes Estrogen/Progesterone ratios.$163.90Read More -

Melatonin Sleep Rhythm Test Kit
Melatonin hormone test (X2) 12AM and 6AM.$140.80Read More
